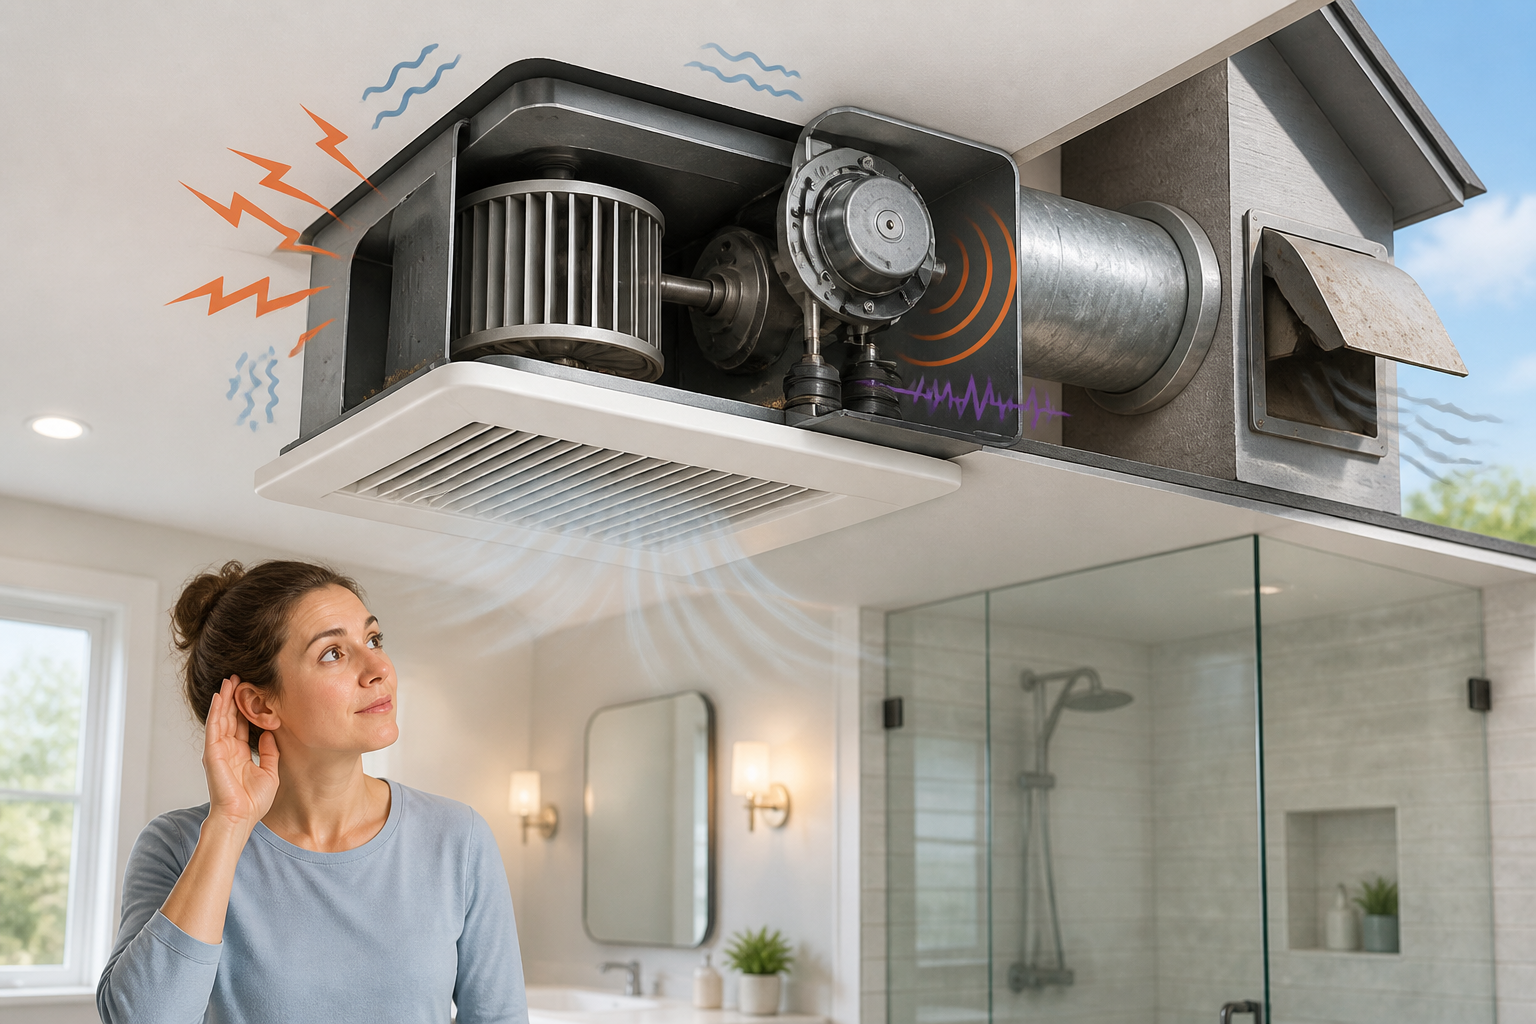
The sound is the best place to start, but pair it with two observations: does the noise happen only at startup or continuously, and has airflow weakened? Listen at the grille, near the fan housing, and—only from a safe, accessible location—near the exterior vent. Do not put your hands near moving parts.
A loose grille, dirty wheel, or damper is usually worth checking before assuming the motor has failed. Persistent grinding, scraping, severe wobbling, or a motor that hums without starting calls for a quicker stop. If you smell burning, see smoke or sparking, notice unusually hot surfaces, melted plastic, damaged wiring, or repeated breaker trips, stop using the fan and arrange qualified help.
Match the Sound to the Next Check
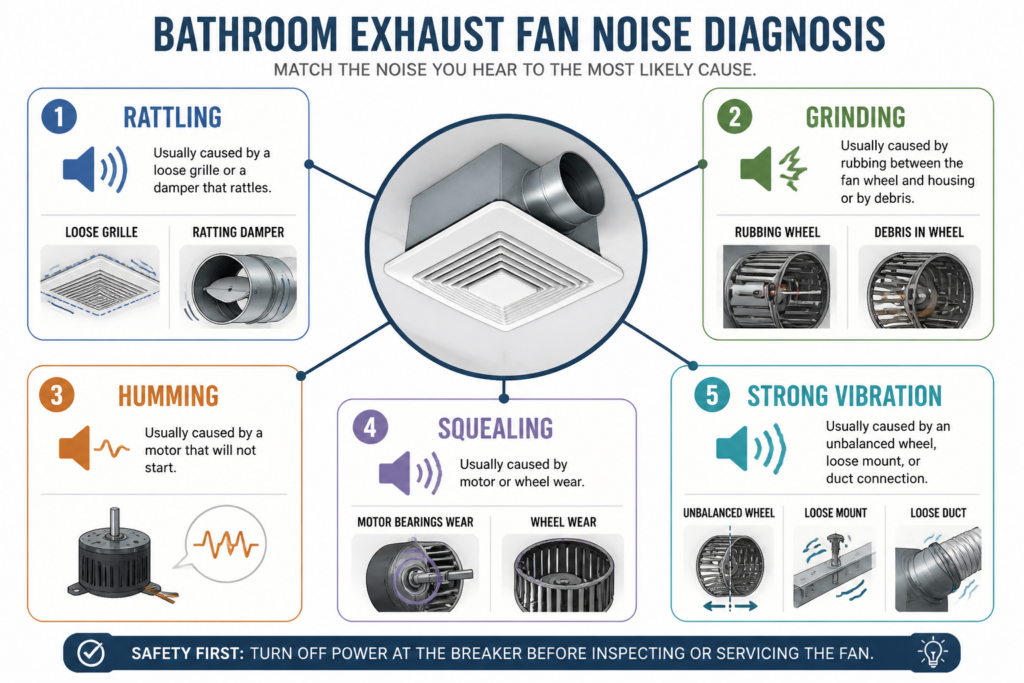
- Rattling or clattering: Start with the grille, mounting screws, fan wheel, and accessible debris. If the noise is louder at the exterior vent, inspect the damper or vent cover from a safe location. A brief flap movement at startup or shutdown can be normal; continuous banging, a stuck flap, or weak airflow is not.
- Grinding or scraping: Look for debris, a bent wheel, or visible rubbing. If the sound remains after cleaning and the wheel is not obviously rubbing, the motor or fan assembly may be worn. Do not keep running the fan repeatedly while trying to confirm it.
- Humming or buzzing: If the motor does not start, switch it off and stop testing it. The cause may be mechanical, a control or motor fault, or—depending on the model—an electrical component such as a capacitor. Heat, odor, flickering, sparking, or breaker trips make it an electrical-service issue.
- Squealing: A motor or wheel problem is possible, but the sound alone does not prove that a bearing needs lubrication. Many bathroom-fan motors are sealed and are not meant to be oiled.
- Strong vibration or droning: Check for a dirty or visibly unbalanced wheel, loose mounting, or a grille that changes the sound. A duct touching framing or a loose exterior cover can also vibrate. Weak airflow makes a duct or damper restriction more likely.
As a quick guide: rattling with normal airflow usually points first to a loose cover, damper, or debris. Noise plus weak airflow points toward the wheel, duct, or damper. Persistent grinding or squealing after basic cleaning points toward the fan assembly. A humming fan that will not start should not be repeatedly cycled.
Isolate Power Before Inspecting
Turn the fan off at the wall switch before removing the grille. If you will clean inside the housing or reach near the motor or wheel, turn off the breaker that actually supplies the fan. Do not proceed if you cannot confidently identify and isolate the correct circuit.
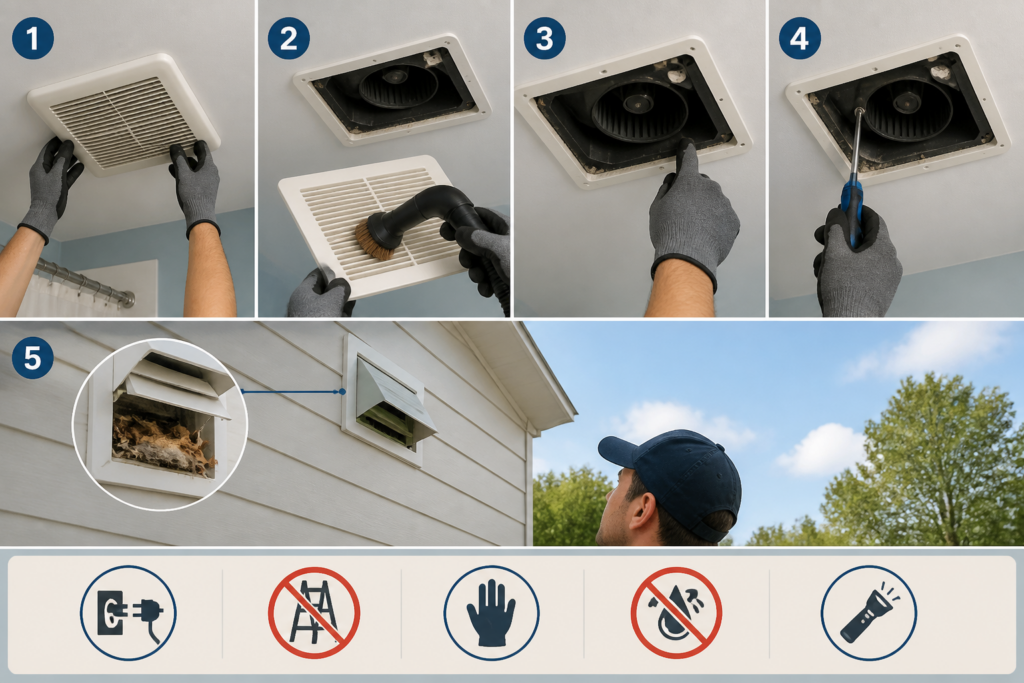
Lights, heaters, timers, humidity sensors, and fans in the same ceiling assembly may have separate controls or circuits. Trying the switches after turning off a breaker is a useful check, but it does not by itself prove that every conductor is safe. Do not open energized equipment, touch wiring, or attempt electrical repairs.
Clean and Tighten the Accessible Parts
- Remove the grille carefully. Support it as you release its spring clips or screws.
- Clean the grille and housing. Vacuum loose dust from the grille and the accessible part of the housing with a soft brush or vacuum attachment. Keep dust and moisture away from the motor and electrical parts.
- Look for rubbing or damage. From the accessible area, check for loose debris, broken plastic, bent blades, or a wheel that is visibly off-center. The wheel may not be reachable without removing a motor plate; do not dismantle parts that are not designed for homeowner access.
- Tighten what is intended to be tightened. Check accessible mounting screws and make sure the grille sits evenly against the ceiling. If the fan is quiet without the grille but noisy after it is reinstalled, the grille, clips, or fit is probably the source.
With power off, gently turn the accessible part of the fan wheel if the design allows it. Stop if it scrapes, catches, has noticeable side-to-side play, or is rubbing the housing. A small amount of resistance does not by itself prove a fault, and you should not force the wheel or bend its blades.
Do not spray cleaner or water into the housing, and do not lubricate the motor unless the manufacturer’s instructions specifically permit it. Restore power only after the cover is back in place and the area is dry.
Then compare the result. If the fan is quieter, dust, the grille, a loose fastener, or a minor obstruction was contributing. If it is quieter but airflow is still weak—for example, steam lingers after a shower or suction at the grille is noticeably poor—cleaning did not solve the underlying problem.
Check the Damper and Duct Without Creating a Bigger Job
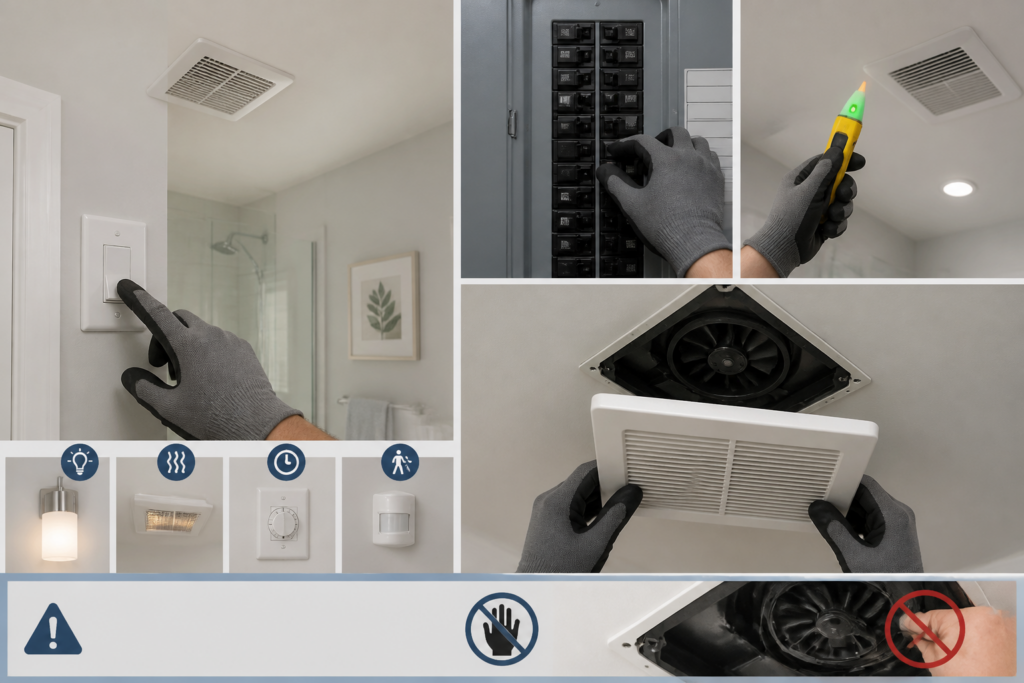
From the ground or another secure location, inspect an exterior vent if it is safely accessible. Look for leaves, lint, nests, ice, or a loose cover. The flap should move when the fan runs, but it should not remain stuck or bang continuously against the cover.
If visible duct sections are safely reachable, look for a crushed bend, a disconnected joint, a long unsupported section, or ducting pressed against framing. A restriction or poor routing is more persuasive when it occurs with weak airflow or noise that is louder at the duct or exterior termination. A shared duct or unsuitable duct size can produce similar symptoms, but it may not be possible to verify without opening walls or shared building spaces.
Do not climb onto a roof or enter an unsafe attic to investigate. Renters should report persistent noise, weak airflow, exterior-vent problems, and fixed-equipment faults to the landlord or property manager rather than modifying wiring or ductwork.
When to Keep Using It, Repair It, or Replace It
Keep using it for now if it is only mildly noisy, has normal airflow, starts normally, has no severe wobble or electrical warning signs, and becomes quieter after cleaning or tightening.
Arrange diagnosis or replacement if grinding, scraping, squealing, failed startup, or severe vibration remains after the accessible checks. A loose motor mount or bent wheel can imitate a worn motor, so persistent noise does not identify one exact failed part—but it is usually a good reason to stop experimenting. A newer or specialized fan may justify a manufacturer-specific replacement motor or serviceable assembly. On an older, basic fan with an integrated noisy motor, replacing the compatible fan assembly is often more practical than rebuilding it.
Before buying a replacement, identify the model if possible and measure the ceiling opening. Check the existing duct connection, electrical requirements, and required airflow, not just the advertised noise rating. New wiring, structural changes, roof work, inaccessible ductwork, or a shared system should be handled by an electrician or qualified ventilation professional as appropriate.
Stop operating the fan and get qualified help for burning odor, smoke, sparking, unusually hot surfaces, melted plastic, damaged wiring, repeated breaker trips, or a humming motor that will not start. Persistent motor-like noise or major vibration also warrants diagnosis rather than repeated cycling or attempts to oil the motor.